Crafts
Related: About this forumHas anyone here ever crocheted a queen size bed spread?
I need to replace mine and i was thinking of crocheting one. I was thinking bulky yarn done in strips. I would use a washable yarn.
sinkingfeeling
(57,090 posts)hedgehog
(36,286 posts)sinkingfeeling
(57,090 posts)The squares are about 12 inches with white background and various colors. They are set between black 2 inch wide borders.
KC
(1,995 posts)nice. I'd like to see a picture of it.
I did one ( can't get to it or I'd take a picture). Like granny squares. Different shades of blues and black. My son picked which one he wanted. It's finished except I just need to crochet around it with a black border of some kind.
SheilaT
(23,156 posts)would work just fine, in my opinion. I'd also vote for a synthetic yarn, as many of them are quite good. Caron Simply Soft yarn is one of my favorites for afghan projects. Right now I'm making one using two strands held together, so in effect you get a bulkier yarn.
If you decide to do the two yarns held together thing, you can get some very interesting tweedy looks as you do the stripes.
A finer yarn, especially the sorts used to make doilies, would simply not work to do an allover large piece, I don't think. Something like that would be at great risk for sagging or stretching, and that kind of yarn is best done as squares that are then crocheted together.
csziggy
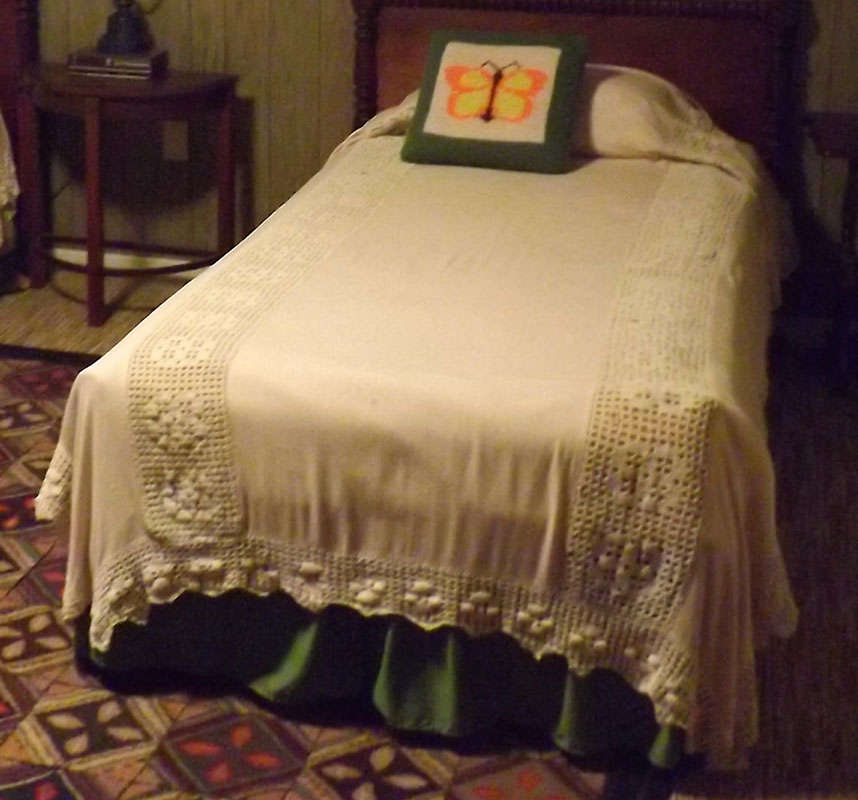
(34,189 posts)With thin ecru color cotton thread - the stuff sold for crocheting. Rather than doing the full spread, she did two strips for each and inset them into a sheet weight cloth, then crocheted an edging around three sides leaving the top edge plain.
She died in 1960 and Mom still uses those spreads, so they've held up well.
2banon
(7,321 posts)does that mean sewn onto what I imagine might have been broadcloth fabric? I'm trying to figure out how I might whip up a quick bedspread project as xmas present for my granddaughters bed, and your example sounds like a good one if I can figure out how to do it.
csziggy
(34,189 posts)Or maybe the cloth had originally been a little heavier than sheet weight. You know, thinking about it the cloth part may have been a sheet, cut to set in the crochet strips. With the two strips about 6" each, that made the entire coverlet wide enough to be a bedspread/coverlet.
The crochet strips go the length of the spread, set in so when the spread is on the bed they are on top at the edge of each side of the mattress. Then there is a crochet edging around the edges.
I wish I had thought to take pictures when I was there last week!
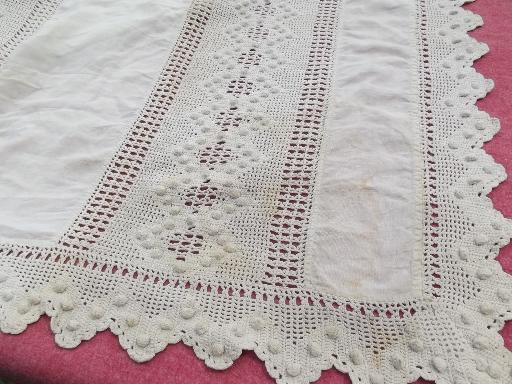
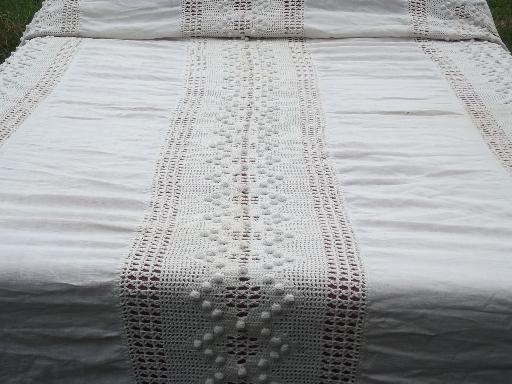
I did some hunting online and here is a similar idea:


The ones my grandmother made did not have as much crochet as this or the same style, but the set in idea is the same.
2banon
(7,321 posts)are the edgings of the crochet pieces and sheet pieces machine sewn together? It almost looks like somehow the edges were joined vis a vis crochet but that can't be the case is it?
csziggy
(34,189 posts)The example I gave you is the same idea but I don't know how it was constructed. It was the only example similar I could find. You're right - on that one they may have used a hemstitch for the edges then used the holes created to crochet the edging and strips to the cloth.
Aha - here is another one that has some close ups - the last picture shows one of the stitching where the crochet is attached:
http://www.etsy.com/listing/84926481/crocheted-bedspread-with-linen-inserts
The crochet in that one is very similar in style to my grandmother's but the overall piece is more elaborate. Like I said, she only had two strips of crochet and the edging was narrower. The style and weight of the crochet looks similar, though hers is now ecru color. I don't know if that was the original color or if it has just turned it with age.
I'll be back down at my mother's for Thanksgiving and will try to take pictures.
ETA - just found a shot my husband took earlier this year! I'll edit it and upload. Back in a few minutes.
2banon
(7,321 posts)explaining, researching and uploading these images.. I love the concept!
I'm not exactly a beginner crochet person, I can work a number of different stitches, basically do hats, scarfs, throws, flowers, leaves, hearts, however crafting various kinds of pieces is another story! Tried my hand at book-markers but those turned out weird.. and discovered I'm quite challenged at seaming pieces together without ugly, thick bulgy effect.. but if the sheets are edged with something I can join with crochet (single stitch probably?) then perhaps I can manage a decent spread for the girls bed, and heck, I'd like one too!
So thanks again!!! ![]()
I used to have trouble with that too, until I tried a different technique.
Instead of putting the right sides together and joining them that way, I now line the pieces up side by side, matching as closely as possible from beginning row to end row, and all other rows in between. It helps if you're able to block your pieces before seaming them.
Anyway, plastic seaming pins are good for temporary lining up of the pieces.
Then use a whip stitch (through the sides of individual stitches), not too loose, not too tight. If it's done right, you can barely tell the right side from the wrong side.
2banon
(7,321 posts)good to know!...
when you say whip stitch through the sides of the individual stitches, is that through the actual fiber of the yarn, or does that mean through a loop? I'm thinking you mean through the fiber, because I've been doing through the the loops, and I think that might be the problem, effecting that bulky appearance?
sew through a loop, not the actual fiber itself, which will weaken the strand and possibly cause a tear.
Pick up one loop and run the needle through, then go over to the other side for the corresponding stitch and grab one loop, working your way down (I like to seam from top to bottom on a flat surface) so that after a few inches you can see the sewing yarn making a diagonal pattern between the pieces.
Here are a couple of examples...this is a free-form shawl/scarf I made earlier this year. Basically you just crochet some motif patterns and piece them together on top of a paper template you've made. Showing the right side where I've left some edges free to add texture...

This is the reverse side where I seamed a couple of pieces together. If you look closely at the gray piece on the left side, you can see the diagonal lines joining it to the white area to its right...through one loop, then back to the gray side through one loop, then back to the white side...one loop, etc.
The sides abut perfectly, and there's no bulky seam.
For this I didn't use seaming pins, but little pieces of yarn to loosely tie one edge to the other. I did this for as large an area as I could, matching and tying, then sewed and removed the little ties as I went.

My next free form project will probably be done in one color only, to highlight texture more.
Anyway, the problem with bulky seams goes away when you match the seams side by side instead of right sides together...
2banon
(7,321 posts)Have you ever considered making youtube tutorials? I've never seen one give this level of detail on this procedure. Thank You!!!
On a side note: I've just spent the past 2 days proceeding with a small sewing project that I've been putting off. Pillow cases.. Should be easy right and done in a snap, right? LOL!
Oh noooo. I just had to try and make them fancy shmancy, with different textured and colored fabrics (not quilted) and ribbons and such, and of course the business with french seams, which I never could figure out in Home Ec class 50 years ago, (of course I never went to class, so that didn't help).. came across a tutorial after you and I were in this discussion (do I get side tracked much?) and thought, oh this should be so easy. I've only had to do about 4 stitch removal sessions.. LOL!
I'm going to use your tutorial for practicing seams, oh by the way, LOVE your Free Form, beautiful work!!
Oh and that's another topic... later.. ![]()
![]()
Btw.. My apologies for delayed reply.. as explained above, I got side-tracked on a sudden case of inspiration... ![]()
csziggy
(34,189 posts)The edging is wider than I remembered and the crochet pattern is very similar to the piece in the Etsy link above. The period is correct for when my grandmother was first married and would have been doing this kind of work.

This at least gives you an idea of how to use less crochet for a big effect.
Sorry about the poor quality - my husband was taking general shots of the rooms in my parents' house and was not getting specific items. I zoomed in on one of the beds and cropped the picture to make it web size.
pipi_k
(21,020 posts)a few years ago for one of my stepdaughters.
I used worsted weight acrylic.
pengillian101
(2,352 posts)Once I got the basket weave mastered, this thing was very fun to make. I hemmed two edges in fringe.
I made it in the 1970' or 80's I think and used a heavy acrylic yarn. It's still good looking and extremely warm. Washes and dries great.
https://www.google.com/search?q=basket+weave+crochet&tbm=isch&tbo=u&source=univ&sa=X&ei=Wb15UsvuLZOrqQGM5YDwCQ&sqi=2&ved=0CDAQsAQ&biw=1272&bih=615
![]()
Kaleva
(40,135 posts)I don't know anything about crocheting so i can't tell you the details other that it's in zig zag stripes and is queen sized and that it took many hours to complete!